With each of these pages my aim is to add some interest to what is really a very simple thing.
I started by working on the most difficult and most interesting part of the design - the snail's shell. As the design often shifts from design to reality I often start with the bit that forms the central part of the design and which, if it moves, the rest of the design can move around.
I traced the outside of the shell onto interfacing. The interfacing is multipurpose.
I wanted the flap of the shell to be a bit stiff and also as with the
page, the interfacing gives me a way to trace the design onto the
reverse of the fabric.
When placement of the lettering is extra important I will often sew it from the back in running stitch as you can see here. In this part I have to be careful where the letters go so that they fit in a small space.
I then go back and fill in the gaps from the front as you can see
After that I started on the spiral.
As you can see in my
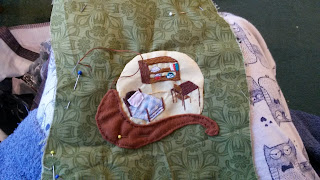
discussion of the book's design, I always planned to have an actual little house inside the snail's shell.
However, as I started work I decided it was no fun to have absolutely nothing on the inside of the flap and added in some more details to that part. I thought I'd put in an aga oven and some other bits.
I had planned to use some applique but it was just far too small so
there is very little applique in the design. Just the pillow and the
main part of the bed and the aga.
Once these parts were all done, I sewed the back and the front of the flap together and turned it inside out and finished it off.
Then I sewed down the inside of the shell on the page, followed by the snail body.
Despite
carefully tracing and cutting out the snail's body and shell the same
size as my design, there's been some shift in size. You can see this
from the back. Fortunately I'm really not picky about this so long as it doesn't look too awful. It's also not a big shift.
I then sewed the flap onto the page and we're done.
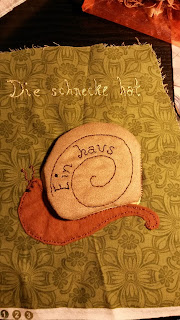
This is the completed page with the snail shell closed. The page text reads "Die schneke hat ein haus" - the snail has a house.
Here you can see the inside of the shell with the flap open. The completed aga, a little hand towel and some kitchen implements hanging up.
I've actually completed quite a few pages so I'm going to separate each page into a separate blog post just to avoid picture overload. I may add in a few more making of photos when I'm back at home.


No comments:
Post a Comment